Intro
Domo supports the creation of Git repositories within the Jupyter Workspaces interface, which enables you to repeatedly push updates to your selected GitHub repository using standard Git operations. For more information about Jupyer Workspaces, see our Jupyter Workspaces User Guide. For more information about GitHub, see their documentation. Jupyter Workspaces is a premium Domo feature. Contact your Customer Success Manager (CSM) or Account Executive (AE) to get access to it. For support, contact Domo Support. This article describes how to use Jupyter Workspaces with GitHub in the following topics:Create Repositories in a Jupyter Workspace and GitHub
- Open (run) a Jupyter workspace that you want to sync with GitHub. To learn how to enable Jupyter and create a workspace, see our Jupyter Workspaces User Guide.
-
Create an SSH key in the Jupyter workspace by following these steps:
- In your Jupyter workspace, open a new terminal window by selecting File > New > Terminal.
-
Set a global user email by entering the following in the terminal window:
Example:
-
Set a global username by entering the following in the terminal:
Example:
-
Create an SSH key by entering the following in the terminal:
Example:This command creates two files. The ‘id_ed25519.pub’ file contains your public SSH key.
- When you’re prompted to “Enter a file in which to save the key”, you can specify a file or select Enter to accept the default file location.
- When you’re prompted to “Enter passphrase”, either enter your selected passphrase or press Enter to add no passphrase.
-
Copy your public SSH key to your clipboard by following these steps:
-
Go to the directory folder where you saved your SSH key (see step 2.e above). If you saved your key in the default file location, you can go to that location by entering the following in the terminal window:
-
Your public key is saved in the id_ed25519.pub file. To open the id_ed25519.pub file and see your key, enter the following:
Your public key should be a string of text/numbers that ends with the email address you specified in step 2.d above. An example public key displays below. Copy your public key to your clipboard. Example public key:
-
Go to the directory folder where you saved your SSH key (see step 2.e above). If you saved your key in the default file location, you can go to that location by entering the following in the terminal window:
-
Add your public SSH key to your GitHub by following the steps below:
- Follow this link to the GitHub website. (You need to be logged in to GitHub.)
- Select New SSH key.
- Enter a name for the SSH key in the Title field and paste your public key from step 3b above into the Key field.
- Select Add SSH key.
-
Create a repository in GitHub that you can push your Jupyter Workspace files to by following these steps:
- Follow this link to the GitHub website. (You need to be logged into GitHub.)
- Enter the information that GitHub requests to create a repository.
-
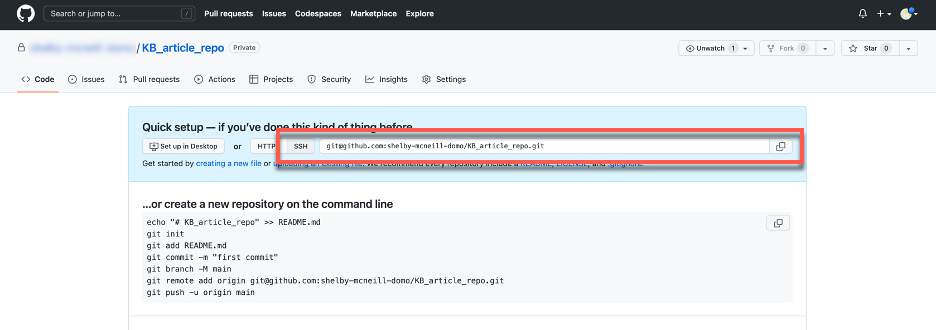
You can find the SSH URL associated with this repository, which you need in a later step, by selecting SSH in the Quick setup section of the repository’s landing page.
-
Create a Git repository in Jupyter Workspaces, and specify the remote repository in GitHub that you’d like to push to by following these steps:
-
In the terminal window, go to the directory folder in Jupyter Workspaces where the file(s) that you want to push to GitHub are saved. If such files are saved in the Home directory, you can go to the Home directory by opening a new terminal window (File > New > Terminal) or by entering the following in an existing terminal window:
(Optional) To verify which directory you are currently in within the terminal window, enter:(Optional) To verify what files are in the directory, enter:
-
Create a new Git repository in the directory by entering the following:
-
Add the remote repository in GitHub that you want to push to by entering the following:
< SSH URL> is the SSH URL associated with the GitHub repository that you want to push to. Step 5.c above outlines how to find the SSH URL. Example:
-
In the terminal window, go to the directory folder in Jupyter Workspaces where the file(s) that you want to push to GitHub are saved. If such files are saved in the Home directory, you can go to the Home directory by opening a new terminal window (File > New > Terminal) or by entering the following in an existing terminal window:
Push Updates from Jupyter to GitHub
-
In the terminal window, go to the directory folder in Jupyter Workspaces where the file(s) that you want to push to GitHub are saved. If such files are saved in the Home directory, you can go to the Home directory by opening a new terminal window (File > New > Terminal) or by entering the following in an existing terminal window:
(Optional) To verify what directory you are currently in within the terminal window, enter:(Optional) To verify what files are in the directory, enter the following:
-
Add the file that you want to push in the next commit by entering the following:
Example:
-
Commit by entering the following:
< commit message > is a short statement that describes what has changes since you last pushed. Example:
-
Create a branch named “main” in the Git repository by entering the following:
-
Push the file to your GitHub repository by entering:
If the following message “Are you sure you want to continue connecting (yes/no/[fingerprint])?” displays in the terminal window, enterin the terminal window. Your file changes now display in your GitHub repository.